
How to Level Ground for a Wedding Tent: 2026 Guide
Table of Contents
How to Measure Backyard for Wedding Tent and Check SlopeTools for a Quick Site AssessmentReading Slope Percentage and Topography
Tools for a Quick Site Assessment
Reading Slope Percentage and Topography
How to Level Ground for a Wedding Tent: Step-by-StepStep 1: Clear and Mark the Tent FootprintStep 2: Grade High Spots and Fill Low SpotsStep 3: Compact, Test, and Recheck
Step 1: Clear and Mark the Tent Footprint
Step 2: Grade High Spots and Fill Low Spots
Step 3: Compact, Test, and Recheck
Choosing the Right Tent Size for Weddings on Sloped Terrain
Backyard Wedding Tent Setup Tips for Uneven Ground
Adjustable Base Plates, Subflooring, and Modular FlooringAdjustable Base Plates: The First Real FixFramed Subflooring: When the Grade Is Too SteepModular Flooring Panels: The Surface LayerA Note on What We Do and Don't Bring
Adjustable Base Plates: The First Real Fix
Framed Subflooring: When the Grade Is Too Steep
Modular Flooring Panels: The Surface Layer
A Note on What We Do and Don't Bring
Drainage, Water Runoff, and Environmental Impact of Site GradingReading Where Water Actually GoesRunoff Direction and Tent PlacementThe Legal and Ecological Side of GradingA Simple Pre-Event Water Check
Reading Where Water Actually Goes
Runoff Direction and Tent Placement
The Legal and Ecological Side of Grading
A Simple Pre-Event Water Check
Tent Stability Safety Checklist and When to Call a Pro
Frequently Asked Questions
Last Updated: September 14, 2026
How to Measure Backyard for Wedding Tent and Check Slope
Learning how to level ground for wedding tent setups starts with measurement, not digging. A 10x20 canopy needs roughly a 12x22 footprint, and even a two-inch drop across that span will leave your 60" round tables wobbling. This guide covers site assessment, grading, and when to call for help.
You're not trying to make the yard perfectly flat, just flat enough that the tent frame sits true, an easier goal.
Slope percentage is the rise in inches divided by the run in feet, multiplied by 100. A drop of 6 inches over a 10-foot run is a 5% slope (usda.gov). Anything under 2% is comfortable for a standard canopy install; 2-5% needs adjustable base plates or shims; above 5% you're looking at scaffolding, subflooring, or a different tent location entirely.
Tools for a Quick Site Assessment
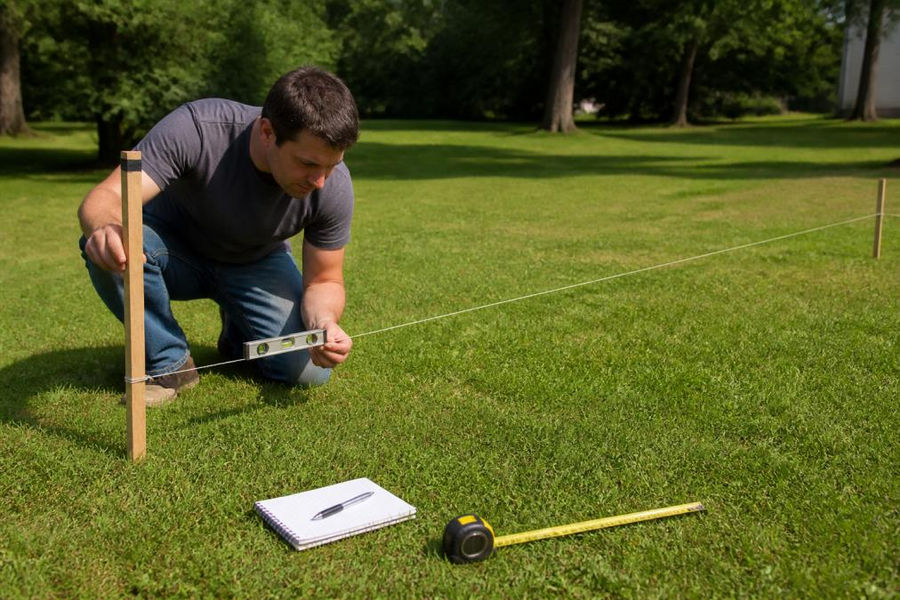
You need five things: a 25-foot tape measure, two wooden stakes, string, a line level, and a notebook. Drive one stake at the highest point of the footprint and one at the lowest, run string between them, hang the line level at the center, and measure the gap at each end. That gap is your rise; pair it with the distance between stakes for your slope percentage.
A National Weather Service guide to local rainfall patterns is worth checking before you commit to a site, since a low corner that pools water after a storm will pool water under your tent too.
Reading Slope Percentage and Topography
Topography matters more than the single slope number. A yard can read 3% overall but hide a 6-inch hump right where a tent leg lands. Walk the footprint in a grid, checking elevation at each corner and the midpoint of every side, and flag the high and low spots.
How to Level Ground for a Wedding Tent: Step-by-Step
The goal is a footprint flat within about an inch corner to corner, not a patio, just removing the worst of the uneven ground so the tent frame and your tables sit level.
Step 1: Clear and Mark the Tent Footprint
Mow the area short, then remove rocks, roots, and anything that would puncture a tent leg's footing. Stake out the footprint with string, adding 2 feet of clearance on every side for guy lines and sidewall stakes. For a 10x20 canopy, that's a 12x22 marked rectangle.
Step 2: Grade High Spots and Fill Low Spots
Cut high spots with a flat shovel or landscaping rake in thin layers, move that soil to the low spots, and tamp it in 2-inch lifts. A hand tamper works for small yards; a plate compactor is faster for a large footprint. Never fill a low spot with loose, uncompacted soil, it will settle the first time it rains.
Step 3: Compact, Test, and Recheck
Compact the whole footprint, then re-run your string and line level. You want less than an inch of variance across the area, and recheck after 24 hours if rain is forecast, since fresh fill settles.
Watch Out Skipping the recheck is the single most common mistake. A footprint that measures level on Saturday morning can drop a half-inch by the afternoon if the fill wasn't compacted in lifts. That's enough to make a 60" round table rock.
Choosing the Right Tent Size for Weddings on Sloped Terrain
Sloped terrain shrinks your usable tent size. A 10x20 canopy that seats comfortably on flat ground may only fit six 60" round tables on a grade, because you lose the corners to height variance. Size down rather than cramming tables into a space where the floor isn't level.
For a seated reception, plan roughly 12 square feet per guest at 60" rounds seating eight. A 10x20 canopy handles about 30 guests seated; a 12x12 works for a cocktail-style setup or a smaller ceremony. If your slope is over 5% and you need coverage for 100+ guests, a single canopy won't do it, look at platform staging or a different site.
Backyard Wedding Tent Setup Tips for Uneven Ground
Set the tent's high-side legs first, then work downhill. Adjustable base plates let you fine-tune each leg independently, which is the difference between a frame that sits true and one that twists. Drive stakes at a 45-degree angle away from the tent so wind load pulls against the soil rather than lifting the stake out.
Keep sidewall panels off until the frame is level. A sidewall installed on a twisted frame will pull the fabric tight on one side and sag on the other, and it never recovers.
Pro Tip Set your tables after the tent is fully anchored, not before. Walking the frame into place shifts legs slightly, and tables placed first will need to be re-leveled anyway.
Adjustable Base Plates, Subflooring, and Modular Flooring
Once you know your slope percentage, the fix is a ladder: shims, then base plates, then a framed subfloor, then modular panels. Each rung costs more time and money, so climb only as high as your grade requires.
Adjustable Base Plates: The First Real Fix
An adjustable base plate is a metal foot that threads up and down on the tent leg, usually through a few inches of travel. You set the high-side legs short and the low-side legs long, then fine-tune each one until the frame reads level, letting each leg find its own height instead of forcing the whole frame onto one plane.
Base plates suit slopes between roughly 2% and 5% and pair well with composite shims for the last half-inch. Two things to watch: they need firm, undisturbed soil under them, and they need re-checking after any rain, because a plate bearing on soft fill can sink a quarter-inch overnight.
Framed Subflooring: When the Grade Is Too Steep
Above about 5%, base plates run out of travel and you need a subfloor: a low platform built on the graded ground, typically pressure-treated lumber on grade, a rim frame around the perimeter, and joists spanning the short direction. The tent then sits on the platform instead of the lawn, so the frame sees a flat, load-bearing surface.
Two details separate a subfloor that works from one that fails. The platform has to be anchored to the ground, not just resting on it, or wind load will slide the whole assembly. And the decking has to be stiff enough that a 60" round table with eight guests doesn't create a low spot between joists, which is why most builders size joists on 16-inch centers.
Modular Flooring Panels: The Surface Layer
Modular flooring is the interlocking panel layer that goes on top of a subfloor, or directly on firm, nearly flat ground for a lighter-duty setup. Panels lock edge to edge on adjustable feet or a grid, letting you dial in a final flat plane without re-grading. The advantage over a bare subfloor is a clean, splinter-free surface at a consistent height.
The trade-off is install time. A subfloor plus modular panels is a half-day project or more for a typical backyard footprint, and it must be built before the tent goes up. For a mildly uneven lawn, base plates plus shims get you there in under an hour. Persistent moisture often complicates these leveling efforts, making the process of fixing backyard drainage a necessary precursor to ensuring a stable foundation for your event.
Situation | Best Fix | Typical Setup Time |
Slope under 2% | Shims under tent legs | 15-30 minutes |
Slope 2-5% | Adjustable base plates | 30-60 minutes |
Slope 5-10% | Framed subfloor with modular panels | Half day or more |
Slope over 10% | Regrade the site or relocate | Multi-day project |
Pro Tip If your slope is borderline between two rows in that table, size up. A base plate that's maxed out has no travel left for the settling that happens after the first rain.
A Note on What We Do and Don't Bring
Sharp Event Rentals delivers and sets up 10x20 and 12x12 canopy tents, 60" round tables, rectangular tables, and folding chairs, and our setup crew handles the leveling and anchoring that goes with them. Subfloor construction and modular flooring panels are outside our rental inventory, so if your site needs a built platform, that's a conversation to have with a general contractor before you book the tent. The honest sequence is: measure the slope, pick the fix, then reserve the tent that fits the leveled footprint.
Drainage, Water Runoff, and Environmental Impact of Site Grading
Most guides treat drainage as a footnote. In practice, water ruins a tented reception more often than slope. A footprint that's perfectly level but sits in a low spot will hold two inches of water after a summer storm, and no amount of shimming fixes that (the EPA).
Reading Where Water Actually Goes
The first step is watching the site, not measuring it. Walk the yard after a heavy rain and note where puddles linger more than an hour; those are the low spots a tent leg will sink into. If you can't wait for rain, look for darker grass, moss, bare patches, and faint channels worn into the turf.
The goal is to route water around the tent footprint, never through it. That usually means a shallow swale, a hand-dug trench a few inches deep, along the uphill side of the footprint and daylighting downhill past the tent. Line it with the soil you removed and let grass grow back. Keep it shallow and wide, since a deep swale becomes a trip hazard and a mud pit.
Runoff Direction and Tent Placement
A tent leg sitting in the path of concentrated runoff will undermine its own footing. Two rules cover most backyard situations:
Never place a leg within 3 feet of a downspout, gutter outlet, or existing drainage swale.
Never dam water against a tent leg. If the natural flow crosses your footprint, divert it uphill of the tent, not around the legs.
If the site drains toward a house, garage, or retaining wall, that's a stop sign. Water that pools against a structure during a tented event can seep into a foundation, and the fix is a site change, not a tent change.
The Legal and Ecological Side of Grading
Grading a lawn is not a neutral act. Cutting and filling strips topsoil and root structure, and it changes how water leaves the property, which is where homeowners get into trouble.
Most municipalities have rules about altering drainage that affects a neighboring property, and some require a permit for grading above a certain volume or near a property line. Call your local building or zoning office before digging deeper than a few inches, keep grading shallow and localized, stockpile topsoil and put it back, and avoid cutting into any slope that carries a neighbor's runoff.
A graded and compacted lawn can take a full growing season to recover. If the wedding is soon and the lawn matters, lean toward base plates and shims over excavation and save heavy grading for a site you don't need to look good next spring.
Watch Out If your site has buried irrigation lines, septic components, or utility runs you can't map, stop before you dig. Hand-digging a swale through an irrigation line is a repair bill and a dead patch of lawn, and hitting a utility line is worse.
A Simple Pre-Event Water Check
A few days before the event, run a hose at the uphill edge of the footprint for ten minutes and watch where the water goes. If it sheets across the footprint or pools near a leg, you have time to cut a swale; if it runs cleanly around the tent, you're done. It's the cheapest test in the process and the one most hosts skip.
Tent Stability Safety Checklist and When to Call a Pro
Run this checklist the day before your event:
All stakes driven at 45 degrees, minimum 24 inches into firm soil
Every leg on a base plate or shim, none resting on bare uneven ground
Frame square, checked corner to corner with a tape measure
Guy lines tensioned evenly, no slack on the windward side
Sidewalls installed only after frame is verified level
Footprint rechecked for settling after any rain
No tent leg within 3 feet of a downspout or drainage swale
Call a professional when slope exceeds 5%, when the site has buried utilities or irrigation lines you can't map, or when the footprint drains toward a structure. Professional installation also matters for larger canopies where load-bearing and anchoring go beyond what a homeowner can safely verify.
Sharp Event Rentals handles delivery, setup, and teardown across the area, including full tent installation so the frame, anchoring, and leveling are done right the first time. You can check availability and get a quote online with a deposit rather than trading emails for a week. If you'd rather handle pickup yourself, local pickup in Bethel is available, and our pricing page lists current rates on canopies, tables, and chairs.
Key Takeaway Level within an inch corner to corner, anchor at 45 degrees, and divert water away from the footprint. Get those three right and a backyard tent will hold up through most of what an Ohio summer throws at it.
Frequently Asked Questions
Can you put a wedding tent on uneven ground?
Yes, but the setup changes. Small slopes under 6 inches across the footprint can often be handled with adjustable base plates and leg extensions. Steeper or bumpy ground needs grading, subflooring, or a modular flooring system before the tent goes up. A quick site assessment tells you which approach fits your yard.
What are the best flooring options for a tent wedding?
For a backyard wedding, temporary flooring like modular flooring or a subflooring platform creates a flat, load-bearing surface over sloped terrain. It also keeps chairs and tables stable. If you are renting a 10x20 or 12x12 canopy tent from a local company, ask whether they offer setup and whether flooring is included, since that affects your ground preparation plan.
How can I tell if my lawn is level enough for a tent?
Measure the slope percentage across the tent footprint. A drop of 6 inches or less over 20 feet is usually workable with adjustable base plates. Anything steeper needs grading or a platform. Use a string level and stakes to check the highest and lowest points before you book your tent.
How do I prepare a backyard for a tent rental?
Start with a site assessment: mark the footprint, check for drainage issues, and remove rocks or roots. Then level the ground by cutting high spots and filling low spots, compacting as you go. If the slope is steep, plan for subflooring or scaffolding. Confirm delivery and setup details with your rental company, including whether they handle ground preparation or just drop off equipment.
Uneven ground is the one variable that ruins an otherwise perfect backyard wedding, and it's the one most hosts discover too late. Sharp Event Rentals delivers, sets up, and tears down 10x20 and 12x12 canopies, 60" round tables, and folding chairs across the area, with adjustable leveling handled on site so your tables sit flat from the first guest to the last. Reserve online with a deposit, or call (513) 278-7822 to talk through your site before you book.
Check Availability & Get a Quote


Comments